Diamond Quilt Progress: Post Eleven

This past week I have fleshed out the sides of the Diamond Quilt. Both sides have been completed.  

This may appear to be solid fabric with a hexagon border, but it is actually a lattice work of hexagons with six separate solid areas of fabric appliquéd into place.  You can see the design below, which also shows how the corners will be completed.

The strips of the lattice work were completed separately, assembled, and stitched to the edge of the quilt top.  The seams of the hexagons were reinforced with stitching and the papers removed.  Rectangular pieces of solid green fabric were then appliquéd into place.

The solid hunter green fabric areas correspond in size to the central maroon areas in the large diamond shapes.  You can see these areas in the image below.


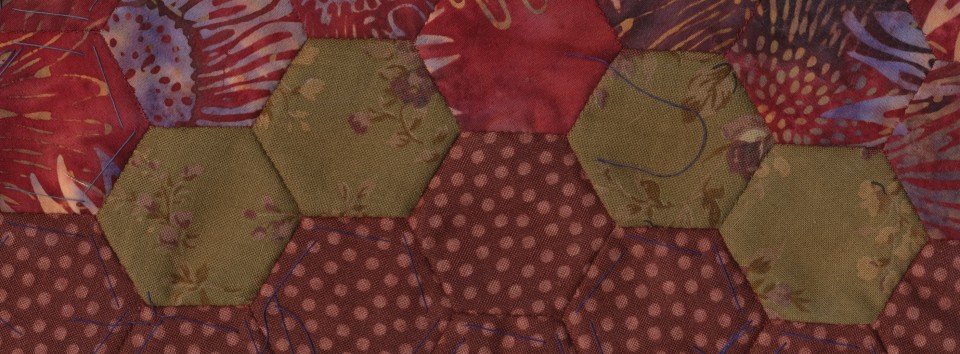
Here we can see the double hexagon lattice work between the solid areas of fabric.

Lori shows her relative disinterest in the quilt top.

Diamond Quilt Progress: Post Ten

Since the last time I reported progress on my Diamond Quilt I have finished off areas 1, 2, 3, and 4.

I started by creating a bridge unit two hexagons wide.  The purpose of the unit was to span the area between the tips of the large diamonds.  I had to make four of these units.

These bridge units were then stitched into place creating the shape where I would add the solid hunter green fabric.

I knew that getting the solid fabric to lie flat and pin the hexagons into place was going to be challenging enough, so I decided to cut large rectangles instead of triangles.  I’m glad I did.  Even though I cut them a few inches larger than necessary in each direction, it turned out to be a big challenge to handle such a large quilt top.  The weight of the piece made it difficult to get a small area of it to be flat on my dining room table.


I really enjoyed sewing the solid fabric into place.  I like the look of the double row of hexagons next to the solid fabric.  I am going to enjoy coming up with quilting to enhance the difference between the hexagonal areas and the solid areas. It took three hours per area to create the bridge, cut and pin the fabric, reinforce seams so papers could be removed, and sew the solid fabric in place.  So that makes twelve hours of work this week. One of the reasons I didn’t mind cutting rectangular pieces to go behind the triangular areas is because I knew I would be able to cut squares for hexagons from the scraps.  Below you can see the squares on the right and the remaining scraps on the left.  I’ll think of something to do with them, I’m sure.  Hunter green is my new favorite color.

Here are a few photos of the quilt top on the queen sized bed with areas 1, 2, 3, and 4 added.


On the agenda for next week is the addition of areas 5 and 6.  These areas have been designed, but those details will wait until the next post.


Diamond Quilt Progress: Post Nine

Since the last time I posted progress on this project I have done a lot of thinking about how to flesh out the edges.

There are ten areas I need to flesh out as shown above.

I came across three pieces I had put together that I was planning to use in a valance for a room divider that I have not yet written about.  I’ll get to that in some future “Second Act Saturday” post.

I used one of these units as the starting point for designing areas 1, 2, 3 and 4 for my Diamond Quilt.

I placed the unit along the edge of the existing quilt top work, and I could see that this idea held potential.

I started by adding three hexagons to get a diamond shape to insert into the space.

I then added a single green border of hexagons to one end of the diamond.

What followed was a series of designs laid out with the aid of hexagons and maroon units that I had completed previously.

I’m actually quite fond of the last one.

I went on to add a second hunter green border to the green patterned diamond and lay out some other options.  I won’t bore you with them here because the pictures are too dark, and I also don’t intend to use any of those options.

What I decided after all the thinking and planning is that these areas should be solid hunter green so they do not compete with the large diamonds.  I am going to use solid fabric to fill in those areas, but I am going to create a green hexagon border for each area to serve as the edge of the quilt.  The solid hunter green fabric will be sewn under the quilt top.  Or, in other words, the quilt top will be appliquéd to the solid fabric.  I will still need to decide how to bind the quilt but I am leaning toward allowing the shapes of the hexagons to remain in the binding.

The relatively large expanses of solid fabric will give the borders a whole cloth look, and I will be able to do some nice hand quilting in these areas.

I won’t be counting any of the time spent doing this design work toward the time spent to finish the quilt.  I estimate that I put in about four to six hours.  Interestingly, I decided to add the full double border of hunter green hexagons to the piece that I used in these design experiments.  I’ll be adding more to it, and I will use it as a testing ground for the quilting I will do on the larger piece.  I may also try an alternate binding method on the experimental piece.


Beyond Quilting: Clothing Repair

A couple weeks ago my husband and I were headed off to a luncheon with a group called the Creative Collective.  I noticed at the last minute that my nail polish was terribly chipped from stitching, and I decided to put a quick coat on so my hands wouldn’t look so shabby.  I dripped nail polish on my skirt and had to do a quick change. I was going to throw the skirt away, but I noticed that LL Bean no longer makes the long version of this skirt, which really annoys me because I practically live in it. After rejecting the idea of throwing the skirt away I decided I was going to fold the skirt over itself in such a way as to hide the nail polish. In the close up  you can see some folds and pin marks from that attempt.  After pinning it I decided I could hide the resulting seam with some hexagons.  Then I said to myself, “Duh… why not just cover the polish with hexagons and keep the full length of the skirt?”  So I took out the pins and decided to buy some fabric that would coordinate well with the skirt. Off to the Pennington Quilt Works I went… uh… without the skirt.

Well, I picked out three fabrics that I thought would work well with the skirt based on my visual memory of the color.  One of them is going to yield a great variety of patterned hexagons because it is full of different patterns.

I bought a half yard of each fabric, and cut off about a quarter of each of those pieces to wash and dry.  I don’t ordinarily prewash fabric, but the skirt has been washed many times, and it will be washed many more times at high heat.  So these fabrics are getting the full heat treatment before I cut my hexagons.

Second Act Saturday: Coffee Table Cover

Today I would like to introduce “Second Act Saturday”.

When I first contemplated blogging about quilting I found my brain hurt from trying to figure out how to get started.  Do I show everything I made during my “First Act”, and then show everything I made so far during my “Second Act”, and then start blogging about what I am doing now?  That seemed like it would take too long, and my brain ached even more thinking about how I might accomplish it.  Do I just start where I am now, and catch my readers up later?  An unrealistic sense of the importance of my personal artistic history made that seem so dishonest.  You have to realize that the best paper I ever wrote in the ancient past that was college was titled “The Artist as Historian”, so that gives an idea of where I am coming from in terms of the importance of self reflection in artistic production. Therefore, I could not help but think that people deserve to know where I’ve been artistically before they see where I am headed now.

The decision was taken out of my hands a few months ago when I joined the Central Jersey chapter of the Modern Quilt Guild. They wanted to know my web site URL.  I knew then that I had to spring to action and start blogging in ernest immediately.  I chose the option of just diving head first into the murky pool of current artistic activity. Yet, I did want to find a way eventually to catch my readers up on the big picture of who I am artistically.

Therefore, today I am introducing “Second Act Saturday”.  On Saturdays I will occasionally show an already finished object from my second act in fibers.  Soon to come will be “First Act Friday” through which I will occasionally show objects completed during my first act in fibers.  I’ll be reaching back forty to thirty years in the past to do this.

Today I will share the second object I created during my second act in fiber arts.  This is a coffee table cover made immediately following the couch runner that I blogged about previously. I’ll provide one photo of the couch runner below.

The coffee table cover is definitely related to the couch runner that came immediately before it. It was was well within my comfort zone using fabrics and shapes with which I had become familiar.

I was using fabrics based on a pallet chosen to be compatible with my This End Up couch.  Below is a photo of the fabric covering the couch.  I walked into the local quilt shop one day with a pillow from the couch under my arm and came out with 13 fabrics selected to work with the couch.

After completing the couch runner I had left over basted hexagons and also left over four hexagon units I had put together.  It made sense to use them to create a piece that would be on display so close to the couch runner.  I decided to use more of the polka dot fabric and less of the green patterned fabric than I did in the couch runner, but all of the fabrics were the same.

The piece got off to a good start.  You can see the folded couch runner in the photograph above. The four part units are pictured above with the green patterned fabric functioning as a background.  The four hexagon unit is featured prominently in the photo below.  They are joined to form columns in both of these pieces.

Lori the cat enjoyed the work in process as usual. She is on my lap as I piece hexagons together.

I’m showing off the reverse side before the piece was basted to the batting and backing.  I baste my hexagons using 2.5 inch squares of fabric, but I trim them before joining.

This piece utilizes a method of binding which I created on my own, although I am sure others have come up with this before me.  I join hexagons together, secure the seams so the hexagons will maintain their shape, then remove the papers before joining the border to the quilted piece.  The binding can best be viewed from the back of the piece where it contrasts with the backing fabric.

A close up reveals not only the beauty of the binding as well as how it allows the shape of the hexagon to be maintained along the border, but also shows significant amounts of crumbs and cat hair.  Oops.

This piece spends a good deal of time as a head rest on the back of my husband’s favorite chair.  In this photo you can see myself as a high school senior in the smaller portrait, and my quilt making  grandmother two years older in the larger portrait.

Diamond Quilt Progress: Post Eight

Since my last progress report I have added a border of hunter green hexagons around the entire edge of the quilt.  It took me 40 hours to complete the border over the course of ten days.  That’s four hours per day on average.

I am showing the quilt on the king sized bed so more of the area of the quilt shows, but later in this post I will show it on the queen sized bed it will occupy when it is finished.

There are some areas that still need to be fleshed out. These additions may not result in straight edges. The binding is still up for grabs. I need to design additions for the spaces between diamonds at the top and the bottom of the quilt.  These are wide half diamond wedges that run horizontally.

I need to design additions for the sides.  These are thinner half diamond wedges that run vertically.

I need to design additions for the corners.  I guess you could think of these areas as quarter diamonds running horizontally.

 In order to get an idea of how the quilt would fit on the queen sized bed, I laid it out there and found that it will fit nicely in the vertical direction, but I think it will fall a bit short in the horizontal direction, so I need to take that into account when I flesh out the left and right edges.  I also need to take into account that I will lose a few inches from shrinkage in both directions when the quilt is first washed.

You can see that there is sufficient length for the queen sized bed.

I’ve reached a point in the work where I really need to think about where to go from here design wise.  I love the mindless sewing together of hexagons.  I will be able to start that again after I made a few design decisions. I have many options for designing the remaining sections which will finish off the edge of the quilt.  I’ll need to make ten sections total, of four specific types, to accomplish that finish.

My initial thought was that I wanted the solid maroon fabric to feature prominently in the finishing of the edges.  However, I have a limited number of maroon hexagons left, and no way to obtain more of this specific fabric.  I have a great number of the printed plum colored fabric, so it’s an option to use that.  One thing I am considering at this point is using the printed green fabric along with the hunter green to finish off the edges.

There are so many possibilities to finish this quilt that I think I need some time to reflect.  I’ll order more of the hunter green fabric, the printed green fabric, and some of a solid green that is available that matches the background of the printed green fabric.  It’s part of the collection. So my next post should involve some decision making.

I am linking up to the Monday Morning Star Count at Life Under Quilts.

Diamond Quilt Progress: Post Seven

Since my last progress report I have sewn my eight large diamonds together.  Using the time estimate of 2.25 minutes per seam that required nine hours of sewing.  I managed to achieve this over the course of three days.

I really like the double row of hunter green hexagons that is created when the diamonds come together.  They look so nice after the white basting stitches come out.

I thought that I was going to have to consider carefully whether or not to add more green hexagons to the outside in order to continue the double border.  It turned out to be a no brainer decision for me.  I immediately decided to add the additional green hexagons to flesh out the border on the outside.  You can see how the border is crying out for a second row of hexagons near the bottom of the photograph above.  How could I refuse?


I’ve already started to add the second border of hexagons, some of that work taking place in bed. I am actually more than halfway finished with the border.  I’m saving those details for my next post, however, which will cover more than a week of work based on the time it is taking me so far.

I am linking back to the Monday Morning Star Count on Life Under Quilts.


Diamond Quilt Progress: Post Six

Since my last progress report I have added the hunter green borders to the last three and a half diamonds.  This brings my finished diamond count to eight.  This work required 21 hours of effort this week.

I had to tempt Lori off of my pile of diamonds with some kitty treats in order to arrange the diamonds on the king sized bed downstairs.  The king sized bed is actually two standard twins on one bed frame. That makes it shorter than a king sized bed by six inches.  This bed is in is our guest bedroom, but its primary function is as a staging area for my quilting work.  I don’t have a design wall yet.  This quilt is going to reside on a queen sized bed when it is finished.  I’ll be auditioning the work in process on that bed next week after the diamonds have been joined.  That will give me a better idea of how much “filling out” of the borders I will need to do. The king sized bed offers more surface area for staging than the queen, however, which is why I am showing the diamonds there now.

The white quilt on the bed is one that I made during my first act in fiber arts.  It was made in the Spring of 1975 in a crafts course I took at Kutztown University. I was completing my undergraduate degree in art education at the tie.  The quilt is nearly 38 years old now. I’ll be featuring that quilt in a future post as part of a series I am going to call “First Act Friday”. It will showcase the few quilts that I completed in the late seventies and early eighties before giving up quilting for over 25 years.  That’s a quarter of quilting inactivity.

When the hunter green borders butt up against each other, and the basting threads are finally removed, the green borders will create a strong design element which will set off the diamonds from each other.  Hunter green will feature prominently in the borders as well.  I just don’t know how yet.

I will admit that I have moved ahead significantly in the stitching together of the diamonds, but I will give no details or photographs of that work yet.  I am not counting that work toward this week, but will add it all up for next week and present the visual evidence in my next progress post.  I have no doubt that I will have all the diamonds joined within the week since I am already about halfway done.  Here is a visual reminder of how nice the hunter green looks without the basting threads.


I am linking back to the Monday Morning Star Count at Life Under Quilts.

Diamond Quilt Progress: Post Five

This week I have added the hunter green border to three and a half of my large diamonds for a total of four and a half diamonds completed.  I show my four complete diamonds as proof.  I’m not faking it.  Really.

That leaves me with three and a half hunter green borders to complete. which I hope to accomplish this week.   I timed myself on the sewing of one hunter green border.  I go into detail about that in yesterday’s post, Timing My Hexagon Work.  It took me six hours to complete one hunter green border resulting in a sewing speed of 2.25 minutes per seam.  That’s two minutes and fifteen seconds per seam.  I’m slow but steady, and I suppose that makes it even more amazing how much I managed to complete this past week.  I figure that I spent twenty one hours piecing last week on those three and a half borders.

It is my goal to spend another twenty one hours piecing this week and finish the remaining three and a half borders.  Then I can begin assembly of the diamonds, which I expect to be the most fun part of this whole project.

I had a big scare this morning when I went to assemble all eight of my diamonds.  I could only find seven of them.  I looked all over and was beginning to think that I had made a mistake about how many I had made.  After tearing the house apart I found the eighth diamond crumbled in a pile under my computer desk.  It had fallen off my lap while I was blogging last night.  Whew!

I’d like to share my simple travel sewing kit I am using lately.  My kit varies depending on what I am doing.  It is very simple right now.  It is a Tupperware container with hunter green hexagons inside.  It also includes my scissors, some spare needles, my sterling silver thimble, and my piecing thread.

I’m linking up with Jessica at Life Under Quilts.

Timing My Hexagon Work

When I first started to quilt with hexagons I decided to time how long it takes for me to baste a hexagon. I baste a lot of hexagons to have on hand, and I sometimes don’t have a project in mind for them when I do the basting.  I discovered that it took me 1 minute and 20 seconds to baste a hexagon.  That included cutting papers, cutting fabric squares, basting the fabric to the paper squares and trimming away excess fabric to leave behind a quarter inch seam.  I came up with this figure by timing some batches of each of these processes and adding together the average figures.   I decided that I would round the time up to a minute and a half for purposes of estimation assuming that I was probably working a bit quicker than I might ordinarily do because I was timing myself.

Recently I decided to time my sewing of the one inch seams on the sides of the hexagons as I piece them together.  I had estimated that these seams would take me a minute and a half each. I based this estimate on some small units I had completed and timed earlier.  I hoped I might have gotten faster in the interim.

I used the timer on my iPhone to time the sewing of the hunter green hexagons around my large diamonds for my Diamond Quilt that is currently in process.

I started and stopped working at least ten times along the way over the course of two days to finish the border.

I was quite surprised to see that it took me a tiny bit over six hours to piece that border.  There are 56 hexagons in the border.  It takes a total of 160 seams to attach the 56 hexagons in the border.  That comes to a disappointing 2 minute and 15 seconds per seam.  I was quite surprised that I was as slow as that.  The seams themselves don’t appear to take that long, and they actually don’t.  What adds to the time estimate per seam is the time spent threading the needle at the start of a new thread, rethreading the needle when a thread manages to slip out of one’s hand or when the thread breaks from too much tension.  In addition to that time is spent reinforcing the points and running the thread up the side when adding a new hexagon to the border. The unnecessary time wasters are when one must untangle a knot in a thread, or when a thread breaks from too much tension resulting in too little thread to finish off a seam.  In that event, it is necessary to pull out an already sewn seam one stitch at a time until the thread is long enough to finish off properly.  Problems can be minimized by working with shorter threads and finishing them off when there is at least eight inches left.  It is false economy of time to try to work with too long a thread, or to try to use every inch of thread.

Having found that my seams take 2.25 minutes to sew and that my hexagons take 1.5 minutes to baste I was able to estimate that each hexagon represents a surprising 15 minutes of effort.  Therefore, every four hexagons represents an hour of labor.

I will admit to being surprised by all of this.  I know piecing hexagons is slow work, but I had no idea just how slow.  I always felt as if I were moving along at a nice clip when I was sitting on the couch sewing. Perhaps that is because it is so enjoyable an activity. The news that I am spending my life this way is not going to dissuade me from hand sewing.   It certainly does, however, give me a good idea of the value of my work in terms of the time invested.  If I ever give away a hand pieced quilt I will be able to say how long it took me to make.

Just for kicks I decided to time the removal of basting threads and papers from one of the largest green patterned borders on my large diamonds.  There are 48 hexagons in the patterned green border, and it took me 8 minutes and 44 seconds to remove the basting threads and papers from the border.

That comes to 11 seconds per hexagon to remove papers.  Considering that I had rounded up the basting of each hexagon by 10 seconds, this amount of time spent removing threads and papers makes up neatly for that rounding.