• About Terri Schurter

Hexy Lady

~ my second act in fiber arts

Hexy Lady

Monthly Archives: May 2015

Low Volume Quilt

30 Saturday May 2015

Posted by Terri Schurter in Uncategorized

≈ 3 Comments

Awhile back I had purchased two jelly rolls of Ivory Basics fabrics. These are all low volume fabrics. I still have one of the jelly rolls intact, but I had cut one of the rolls into 2.5″ squares and I have basted nearly all of those squares at this point.

As a starting point for designing a low volume quilt, I decided that I wanted to create flowers using one print for the outside petals and a solid fabric for the center of each flower. I chose Kona Snow for my solid color.

Here we see the Kona Snow center along with the darkest print in the Ivory Basics collection. This will be the greatest level of contrast in the finished project. But at this point I am merely making flowers.

While shopping for the Kona Snow I came across a Kona Fat Quarter bundle of twelve fabrics that I simply could not pass by. It is called “Not That White”, and it has twelve different whites in the bundle.  I liked it so much, and I could see so much potential in it, that I actually ordered two of the bundles.

I’ve got plans for one of these bundles, but that is going to be another post.

Share this:

  • Email
  • Facebook
  • Twitter
  • Pocket

Bad Kitty

24 Sunday May 2015

Posted by Terri Schurter in Uncategorized

≈ 2 Comments

Share this:

  • Email
  • Facebook
  • Twitter
  • Pocket

Second Act Saturday: Air Conditioning Panels

23 Saturday May 2015

Posted by Terri Schurter in Uncategorized

≈ 1 Comment

Second Act Saturday is a feature whereby I do a little show and tell about something I created during my Second Act in Fiber Arts, but about which I had not yet blogged.

Today I am going to show off my air conditioning panels. We have a window unit in our dining room powerful enough to cool the dining room and the living room. In order to not overwork the air conditioner and to keep costs down we had hung old quilts between the living room and the hallway, and also between the dining room and the kitchen. We folded the quilts in half lengthwise. They didn’t look bad, but they certainly were not color coordinated with the walls.

When I took up quilting again two years ago one of the first things I planned to do was to create quilted hexagon panels to replace those old quilts that we dragged out every year. I started at the end of the summer two years ago and barely expected to finish one panel by the next summer. Amazingly, I finished both panels and the hung them for the first time last year and enjoyed them all summer. I got a few photographs of them hanging, but I never got photos of them in my usual staging area, which is the front porch.

So I laid them out and took some photographs to share.

Here is the panel that hangs between the dining room and the kitchen. The dining room is painted a fairly dark green color. The reverse of this panel is the brownish red polka dot fabric that appears in the front. The kitchen has a red theme, so that works nicely.

Here is the panel that hangs between the living room and the hallway. The living room is a dark maroon color. This piece looks as if it involves fussy cutting. The truth is that I did not even know what fussy cutting was when I made it. After cutting hexagons from the flowered material I noticed that some hexagons had more of the flowers and some hexagons had more of the leaves. When putting together my units for this piece I took that into account. I think you could call the method I used “fussy choosing” because the decisions were made after the cutting took place.

People really like this piece. It always gets a lot of attention. There is a masculine element to the piece with the brown patterned fabric that looks like it would be at home in a men’s silk tie. Then there is a feminine element with the flowered fabric that would make a nice sun dress. It all gets tied together with the brown Kona solid. The back of this piece is the Kona Solid.

This is the piece that I get my shrinkage estimates from.

Here are some close ups of the above piece.


My husband will be installing the window unit soon and hanging the panels.

Share this:

  • Email
  • Facebook
  • Twitter
  • Pocket

More Math About My Quilt Top

20 Wednesday May 2015

Posted by Terri Schurter in Uncategorized

≈ 1 Comment

I recently expressed the need to make the Batik Flower Garden Quilt top larger. If you are math averse you should turn away now… quickly.

I laid the top out on the queen sized bed downstairs and measured it at 87 inches in width and 97 inches in length.

How much overlap does this provide beyond where the mattress meets the boxspring? There is a 2″ overlap on the left and right. There is no overlap on the top and the bottom. (in fairness I allowed the top to extend over the edge a bit because I know that even if I have too much length I can always allow some to hang down over the top.)

I’ve converted my previous shrinkage experiment results into rough percentages.

In the width wise direction 22 inches of quilt top should yield 1 inch of shrinkage. That comes to roughly 4% shrinkage.

In the length wise direction 18 inches of quilt top should yield 1 inch of shrinkage. That comes to roughly 5% shrinkage.

I have a three yard length of 108″ wide fabric for backing, so neither of my final quilt top dimensions should exceed 104 inches, and even that it cutting things too close for comfort. I don’t want to get to the end of basting and find myself one inch short on my backing fabric.

I need to decide how many more rows to add to obtain a large enough to give me a quilt top that will provide the coverage I need, will work with my backing fabric, and account for shrinkage.

FOR THE WIDTH: If I add a row of hexagons to the side it will add 1.5 inches of width to the quilt top. So two rows adds 3 inches to a side, which is 6 inches in total yielding a final width of 93 inches. Estimating 4% shrinkage, the washed quilt will be 3.72 inches smaller (nearly four inches) for an estimated final width of approximately 89 inches. Subtract the 60 inch width of the mattress and you get 29 inches. Half that and you get 15.5 inches per side. Subtract the 11″ thickness of the mattress and you get an overhang of 4.5 inches per side. That might be more than I need. So I can consider adding just one additional row of hexagons on the side. If I go with that the overhang will be approximately 3 inches. That seems just about right. So it’s going to be one more row of hexagons per side with a final width of 90 inches.

FOR THE LENGTH: If I add add a row of hexagons to the length it adds 1.75 inches. If I add three rows that will add 5.25 inches to the length for a final length of 102.25 inches. I really want to add four rows, but the resulting 104 inch length would have been cutting things too close with the backing fabric which measures 108 inches at three yards. I ought to go measure that fabric because they might have cut it generously. Score! I got an extra four inches! My backing fabric is 112 inches long. Four rows will be no problem. 97 plus 7 = 104 inches. With a 5% estimated shrinkage of 5.11 inches the washed quilt should be about 99 inches long. Now to determine the overhang… Take 99 inches and subtract 80 inches for the length of the mattress  and you get 19 inches. We only really need overhang on the bottom, so subtract 11 inches for the thickness of the mattress and you get 8 inches for overhang. This may seem like a lot compared to the 3 inches we want on the sides, but some of the remaining five inches will be taken up by the height of pillows, and the rest can be adjusted by allowing some of the quilt to hang over the top edge.

After all of these calculations I am planning to add one row of hexagons to each side, and four rows to the height. Perhaps I will add one of them to the top and three of them to the bottom.

I will be interested to see if my shrinkage estimates prove to be on target. I realize that my backing fabric is not a Kona solid, so that may throw things off. The backing of the piece I worked with for my shrinkage estimates had a Kona solid backing. I’ll be using a similar cotton batting, so that shouldn’t effect anything.

My Kona Burgundy yardage has arrived, and my next step will be to cut binding strips on the bias to bind this quilt. That will leave me with extra pieces I can cut for more hexagons. I will be needing them for those six rows.

This piece has approximately 3,300 hexagons in it so far.

Share this:

  • Email
  • Facebook
  • Twitter
  • Pocket

Thoughts About Social Networks and My Blog Name

18 Monday May 2015

Posted by Terri Schurter in Uncategorized

≈ 9 Comments

Attending the technology workshop lead by Jessica Skultety of Quilty Habit made me think about how my use of social media does not relate to my blog name. It also made me think about how my blog name and social media user names may be working at cross purposes, and thwarting my desire to be noticed. Right up front I will admit that I blog to be noticed, and hopefully to form connections in the quilting community. I don’t have a business to promote. I am not selling my work. I don’t do long arm quilting. I just want people to find value in what I post, and to notice me as a result.

When talking about getting noticed I should declare that I am a big fan of Michael Hyatt. I found him when Evernote retweeted something he had posted on Twitter years ago. I have been following him ever since. I read his book “Platform: How to Get Noticed in a Noisy World” when it first came out. I later went on to join Platform University, and have been a member there for nearly two years.

It was based on the suggestions in Michael Hyatt’s book that I started my blog. He recommends obtaining one’s own real name as a domain name if at all possible, preferably with a .com extension. He also recommends using WordPress and self hosting. I had owned terrischurter.com for years, yet I was reluctant to use it for a quilting blog because I did not already have name recognition in the quilting community. I am planning on pointing terrischurter.com to my hexylady.com domain eventually. I just have not gotten around to it yet.

Having looked around the quilting blogosphere it seemed to me that short and catchy names that related to the world of quilting were the preferred urls. Having discovered the love of hexagons, and feeling quite committed to them, I decided to grab “hexylady.com” when I found it available. I had noticed that the twitter name “hexylady” was taken, though never actually used. I had no real interest in Pinterest or Instagram at the time, so I didn’t even think to check them. I already had a Twitter account of “terrischurter” and decided to continue to use it.

I made a conscious decision to use my full real name for all social media accounts moving forward. I chose to do this because my real name is always available to me thanks to the fact that it is so unusual. I also decided to make sure that that my full name appeared whenever I responded to a comment on my blog. At first I only used “Terri” when I responded to a comment. Now I use “Terri Schurter”. I figured that over time my real name would become associated with my blog url. I am now considering a way to make my full name more prominent on my site, such as changing “ABOUT” to “ABOUT TERRI SCHURTER”

During the quilting technology workshop one of the attendees said she could not find me on Instagram, and I said, “I’m terrischurter.” And she said, “Nobody will find you that way.” That’s when I started to worry.

After the workshop I decided to check and see if “hexylady” would be available on Pinterest, and much more importantly, on Instagram. I could not obtain the name on either site. So I tried a little experiment. I changed my real name on Instagram to “Hexy Lady” to see if someone could find my “terrischurter” account by searching for “Hexy Lady”. That worked fine as long as they put in the space between the two words, which they might not be likely to do.  If they simply typed “hexylady” I could not be found. Then I tried changing my name to “HexyLady” and it worked just fine. So I am going to leave my name as HexyLady for the time being.

On Pinterest I tried changing my real name to “HexyLady” using the place provided for a first name. This did not have the desired results, so I changed it back to Terri Schurter. I don’t think it will make that much of a difference because I feel as if Pinterest is much more of a way to gather inspiration than a way to share my work.

I am not 100% sure about using HexyLady as my real name on Instagram, but I can always change it back.

What are your thoughts on using Social Media in the quilting community?


Share this:

  • Email
  • Facebook
  • Twitter
  • Pocket

Signed Up On Networked Blogs

16 Saturday May 2015

Posted by Terri Schurter in Uncategorized

≈ 4 Comments

I attended a technology workshop today at the Pennington Quilt Works. Jessica Skultety, the President of the Central Jersey Modern Quilt Guild did an excellent presentation of what are arguably the four most common social media sites for quilters. She covered Flickr, Facebook, Pinterest, and Instagram.

I’ve used Flickr and Facebook pretty extensively. I do have Pinterest and Instagram accounts, but I have really done nothing with either of those services. I have a total of seven pictures up on Instagram, and one of them was posted today during the workshop. That happened to be a photo of my newly acquired Janome Skyline S5

One thing Jessica talked about was a service that would automatically post to Facebook when one publishes a blog post. That service is called Networked Blogs. I signed up before leaving the workshop. When I got home I explored the site a bit more on my desktop, and a search for “quiltyhabit” brought me to Jessica’s blog on Networked Blogs, and I was able to follow it.

I noticed under “settings” there is an option to have Facebook Integration. That is what Jessica must have been talking about when she said it would post to Facebook for me. So this post is a test of the Facebook Integration functionality. I am hoping to see this pop up on my Facebook Timeline after I post it here.


Share this:

  • Email
  • Facebook
  • Twitter
  • Pocket

Not All Queen Sized Mattresses Are Created Equal

15 Friday May 2015

Posted by Terri Schurter in Uncategorized

≈ 2 Comments

My husband and I bought a new queen sized bed for the downstairs bedroom a week ago. I spread my Batik Flower Garden Quilt out on it and discovered something that I had already suspected. We’re gonna need a bigger quilt top!

Yikes.

The photo above shows what the quilt top looked like at the mattress store just before I headed off to the First Slow Stitching Movement Getaway. Since that shot was taken I have added two more borders of burgundy hexagons. The top was looking as if it had enough overhang when I placed it on my queen sized bed in the upstairs bedroom, Therefore, I was getting ready to move forward with basting. However, on the downstairs bed the quilt top just barely made it to the division between the mattress and the boxspring. Here’s why…

UPSTAIRS

DOWNSTAIRS

The mattress upstairs is 8 inches thick, and the mattress downstairs is 11 inches thick. Each mattress has a correspondingly thicker or thinner boxspring. So both beds achieve the same height. I have to say that I actually prefer the upstairs configuration better for quilt display. The downstairs configuration is going to require that I add at least three more inches to the the left, right, and bottom sides of the quilt top.

We are talking about quite a bit of extra work, but I intend to do it because I have invested a great deal of time into this quilt already. Plus I will be investing a great deal more before I am done. I am planning to do some rather dense hand quilting to make this quilt into a real showpiece. I want this to be the one that the heirs fight over.

While I am planning to learn how to machine quilt soon on my Janome Skyline S5, I am committed to doing this quilt entirely by hand, all but the application of the binding to the front.

Here I am adding some burgundy hexagons in bed…

Below is a photo showing one of the sides of the quilt top. You can see that the area closest to the edge is nothing but solid burgundy hexagons. That could just as easily have been achieved by cutting widths of solid fabric and sewing them to the top. I think that going to the trouble of adding this width with hexagons adds integrity to the process.

It also makes the final hundred or more hours of stitching into quite a meditative act… nothing to think about here… Just stitching, folks.

This mattress revelation does raise the question of how large one should make a quilt. If you are making a quilt without knowing who it is for you can’t know how thick the mattress will be where it will eventually reside. If you do know who you are making it for you should certainly ask them to measure their mattress and find out whether they require it to cover the gap between the mattress and the boxspring.

Share this:

  • Email
  • Facebook
  • Twitter
  • Pocket

My Apple Watch Review

12 Tuesday May 2015

Posted by Terri Schurter in Uncategorized

≈ 3 Comments

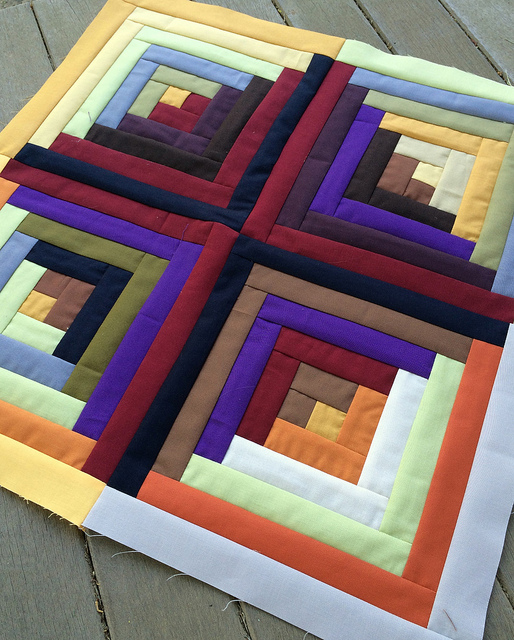
On occasion I will write about technology here on my quilting blog assuming that it relates to my quilting life. This is one of those occasions.

I am a lazy-assed hand stitching English Paper Piecing bitch who would sit on her butt for hours at a time unless something happened to pry me away from the couch. So the Apple Watch definitely impacts on my quilting life. It reminds me to stand up every hour to fill a blue ring in the Activiy app.  Okay, that is stretching it a little. I really just WANT to write about the Apple Watch, and so I will.

Let me begin by saying that I have been a wearable fitness junkie since 2009 when I bought my first fitness tracking device called the Go Wear Fit armband, which later was renamed Body Media Fit. It is a device that you wear 24 hours a day to track steps, calories, and sleep. It requires a subscription to its web site to house your data at a rate of about $7.00 per month, although you can buy longer periods of time at lesser rates per month averaged out over the longer subscription.

I wore the armband for five years, but the subscription was pricey, and the device itself was obvious when worn with short sleeves. The armband was a real conversation piece because people usually noticed it and asked about it. I didn’t mind that, but what I did mind was that the armband left a bit of an indentation in my upper arm on the occasions when I decided not to wear it, like at the pool.

I decided to stop wearing the Body Media Fit about a year and a half ago, and I immediately got lazy because I no longer had my data. I stopped running, I moved less, and I gained weight. So I know that these wearable devices really do motivate me to be more active and fit. I had considered getting a Fitbit, or a Jawbone when I stopped using the armband, but I knew that the Apple Watch was on the horizon, and I decided to wait for it. I did use a pedometer for awhile to try to motivate myself to keep walking while I waited for the Apple Watch.

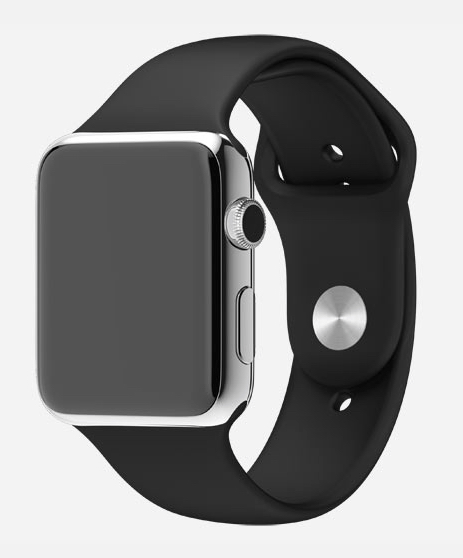
When I went in for my watch appointment at the Apple Store I started out with the Stainless Steel Watch with Milanese loop. My impression was that it was dressy, and that it went well with my 18 karat gold bracelet.

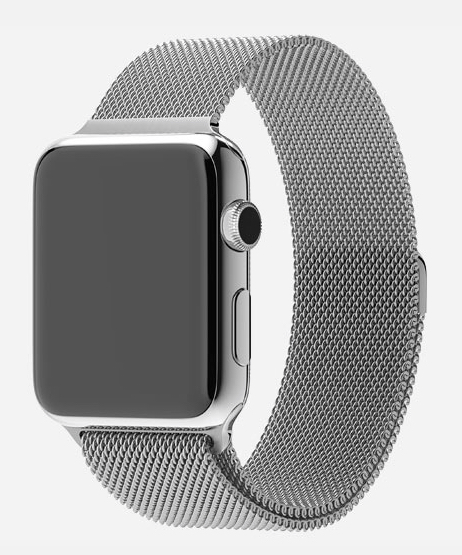
I tried on a Sport Watch too, but rejected it because I wanted to eventually buy more bands for the watch, and I didn’t feel that the aluminum case would go well with some of the bands. I expressed an interest in the modern buckle and was shown the pink leather modern buckle band. These bands can only be used with the 38mm case. I was amazed at how much I liked the modern buckle, but it would have added $200.00 to the initial cost of the watch over the purchase of the stainless steel Apple Watch with the sports band.

I decided to pre-order the Stainless Steel Apple Watch with Black Sports Band in order to get the watch as quickly as possible. I figured I would want a sport band for serious workout sessions anyway.

My order was placed only a half a week after preorders began, but by then the wait was eight to twelve weeks to get the watch I finally ordered. The wait would have been into July if I had ordered the pink leather modern buckle band that I really wanted. Plus there was a level of sticker shock on that pink band, the cost of which approached the cost of a Sports Watch. Therefore, I chose the sports band in order to have the watch on my wrist as soon as possible at as low a cost as possible. I can always accessorize later, and I will.

So, now that I have worn the watch for a week what do I think?

I love the Activity App and the Workout App. For the rest I could just as easily pull the phone out of my pocket. Those two apps alone, however, are well worth the price of the Apple Watch in my opinion.

I had been a constant watch wearer during my career as an art teacher. It was essential to me to be ultra aware of the time. I had to start clean up at just the right time to get as many as 30 teenagers finished cleaning up with minimal time left for them to be unoccupied enough to get into trouble before the bell rang to change classes. After I retired I stopped wearing a watch because the time of day was only slightly more interesting to me than the day of the week, all of which could be obtained by reaching into my pocket for my phone.

When I paired my watch to the iPhone I chose not to bring over apps to the Watch that existed on my phone. I decided to start out with the preinstalled apps only. I figured it would be easy enough to bring over one app at a time if I decided I needed them. I did eventually bring over the Evernote App and I installed the Nike App after looking at the fitness apps available through the Watch App on the iPhone.

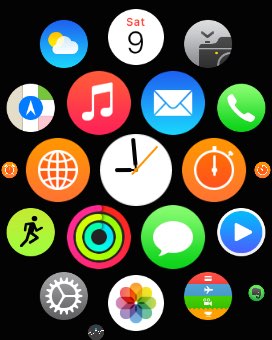
You can see the Evernote app in the lower right of the screen capture above. By the way, you can take a screen capture by holding in the two buttons on the watch simultaneously. That’s how I got some of the images for this post. I read about a way to make all of the icons the same size by going to General>Accessibility in the Watch App on the iPhone and choosing to Reduce Motion. I may do that and arrange my icons in a narrow long strip.

The first thing I did when I got the watch was to try out the Micky Mouse clock face. I like it as a novelty, but I chose an analogue watch face because I wanted to add the Activity App to the face so I could check on my progress easily without going to Glances or the Home Screen.

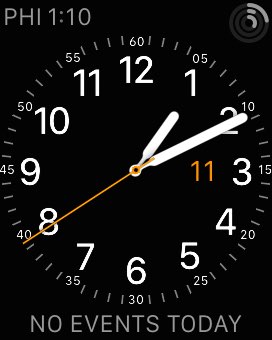
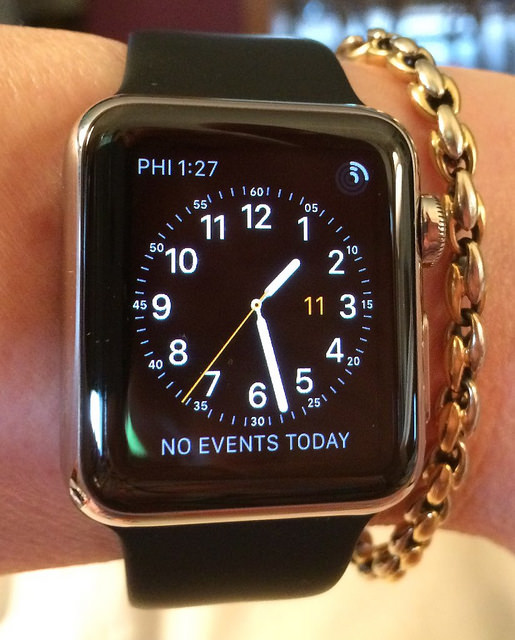
You can see the Activity App in the upper right above. I have local time in the upper left, which is rather redundant, so I may change that to something else. I also have calendar events. This shows that I really do not have a life. Instead of saying “NO EVENTS TODAY” could it just be blank, or maybe say “LOSER” instead?

Speaking of Glances, the watch comes with quite a few of them installed. To reach them you swipe up from the bottom on the watch. I ended up turning off all but a few. I have Now Playing, Heartbeat, Battery, Activity, and Calendar as being active. These are probably more than I actually need. I can get to Activity from the watch face, so I could take that glance away and not miss it. I wouldn’t miss Calendar or Battery either.

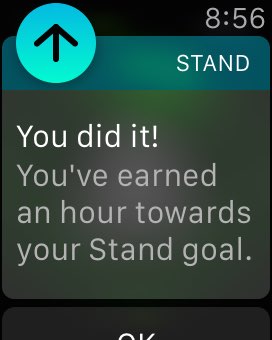
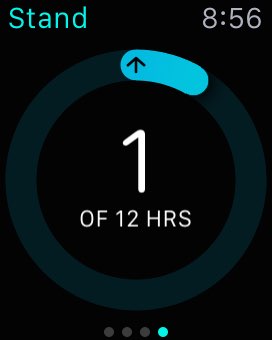
Having strapped a watch on my wrist after so many years, I do find myself more interested in the time of day than I was previously. This may be for no other reason than that I know that I will likely be asked to stand up at about ten minutes before the end of each hour. The watch prompts you to stand up if you have not already earned a minute to help close the blue circle for standing in the Activity App. This can be annoying, yet I really want to close that ring, so I am usually glad to receive the reminder. It not only reminds you to stand up, but it also lets you know when you have earned that minute.

When I first got the watch it did not seem to be well attuned to my calorie burn. Now it seems to be giving me more credit. I was disappointed when I used the workout app for an outdoor walk and was not given credit for as many minutes as I thought I should have been. It isn’t obvious what criteria are being used to determine which minutes count for activity, but I suspect that heart rate is the most important thing being taken into account. The fact that my resting heart rate is between 60 BPM and 65 BPM might make it harder for me to be getting credit for exercise because I have to raise my heart rate to some arbitrary goal that is much farther from my resting heart rate than some slouch with an 80 BPM resting heart rate. Oh well.

What was even more disappointing was when I used the Workout App to track the first bike ride I had taken in a couple of years. The ride lasted about 17 minutes, and covered nearly two miles. I was huffing and puffing on the inclines because I had forgotten how to change gears. I got home dripping in sweat all excited to see how I had done. I had been credited with one minute of activity for the green circle. WTF? I will replicate this bike riding experience at some point in the future.

My experiences with credit for activity minutes in the Workout App made me decide to do a search to see if others were experiencing similar problems. I came across a post in the Apple Community addressing this problem. To make a long story short, it turns out that if you select “Other” as the workout type you may end up with more credit than if you choose an outdoor walk or run.

The day before my watch was delivered I got an email inviting me to set up an appointment online to set up the watch. I saw that the first available appointment was two days hence, so I decided to wing it, and I did just fine setting up the watch.

After living with the watch for a few days I decided to make a pilgrimage to the Apple Store to see if someone there would walk me through basic features to see if there were things I might have overlooked. Jason was very helpful, and he showed me a few new things including how to use the watch as a camera remote, which is one of the things I had not bothered with yet. I thanked him for that, and told him that this was precisely why I came in to the store for the full watch experience.

Thanks Jason for giving me the opportunity to show the world how old and fat I look in this photo. It’s not the best angle. I did question Jason about whether he thought his tattoos were going to be an issue with the Apple Watch. He told me that he had tried one on and that he is lucky that he has an empty space in the sleeve at just the right place, so the heartbeat app won’t be an issue for him. Before I left the store Jason helped me try on a modern buckle in the medium size in blue. They only had the pink on hand in a small. Jason recommended that I purchase a large since the medium was set nearly as large as possible and did fit. He said I would have more latitude with the larger size. That was good to know. That purchase is still months in the future, however. The Milanese loop may be next.

After my difficulties with the Activity app I decided to try an experiment with “Other” in the Workout App. I started an open ended “Other” workout and took care of feeding my cats, scooping the liter box, sweeping the kitchen floor, and mopping the kitchen floor. After 17 minutes I had earned 72 active calories and 28 resting calories for a total of 100 calories. I had been credited with all 17 minutes of activity during which my average HR had been only 94 BPM. I think that “Other” is more generous than outdoor walking and outdoor cycling because the watch doesn’t really know what to expect, and it takes you at your word that you are doing something active for the full time you are doing it. If my heart rate had been really low that might not have been the case, however. More experimentation is required.

Here is a screen shot of my day the first time I was able to close all three rings. The blue standing ring was the biggest challenge. If you miss an hour here and there it is really hard to close that ring. I have also noticed that sometimes it takes a long time for the watch to recognize that I have in fact stood up and moved. On one occasion it took about six minutes of walking before it was willing to acknowledge that I had stood for a minute. I have also had the watch fail to notice that I have been on my feet the entire hour. The standing ring may be the weak link in the activity trio. I hope this improves over time.


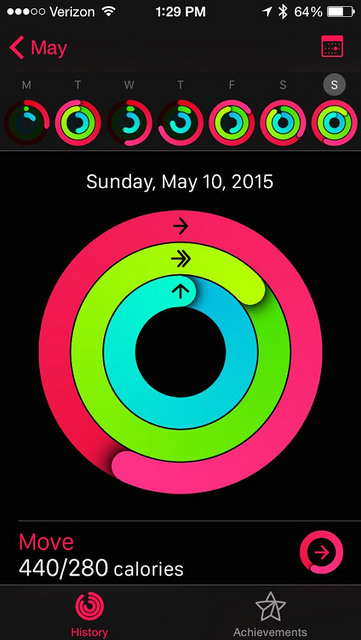
After one week with the Activity App I was asked if I wanted to change my Move goal. I decided to up my goal to 320 calories, up 40 calories from the 280 calories I had started with. The watch now seems to be giving me more exercise minute credit than it did initially. I think it must know me better. I have six minutes so far today and I have simply been moving about the house doing light chores like loading the dishwasher, taking care of the cats, and putting a load of wash in the washer.

I do not get a lot of VIP emails, nor do I get a lot of text messages, so I have not really cared much about those features. Yet it has been nice to be able to look at my wrist on the few occasions when those alerts come through and to know if they are critical or not. Sometimes I don’t bother to pull out the phone to respond to an email that can wait. Without the watch I wouldn’t know I didn’t have to pull out the phone.

It took me about three days to really start to “feel it”. Up until then I thought, “I don’t need this, and I am not even sure I want it.” Now I know for sure that I want it, and at some point I might even feel as if I need it. But wanting is enough for me, so I’m happy.

Here is my Stainless Steel Sport Band Watch alongside my 18 karat gold bracelet. It may not be obvious, but this bracelet is a combination of white and yellow gold links. I would really like to see this bracelet paired with the Rose Gold Edition with the Modern Buckle. That would show all three colors of gold together in one place. If only I had $17,000.00 to burn.

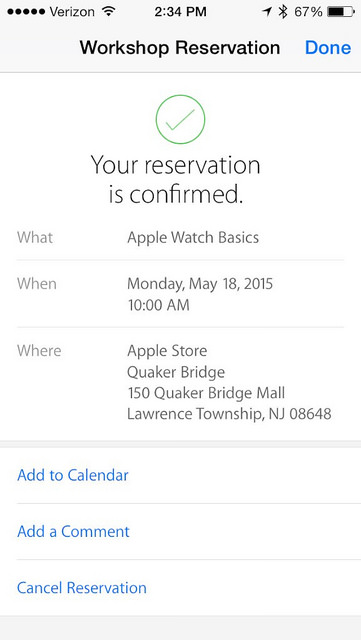
Jason informed me that they now have Apple Watch group lessons, so I signed up for one. They also have sessions for One-to-One with the Apple Watch so I may sign up for one of those too. I’ll do the group session first though to see how it goes.


Share this:

  • Email
  • Facebook
  • Twitter
  • Pocket

Getting to Know the Skyline S5

08 Friday May 2015

Posted by Terri Schurter in Uncategorized

≈ 6 Comments

I finished the one border of burgundy hexagons that I was working on when I was at the First Slow Stitching Movement Getaway last month. I have since put the Batik Flower Garden Quilt aside so I could focus on my new Janome Skyline S5 sewing machine.

You may recall that I was experiencing some significant stash envy as I was preparing to go to the stitching retreat. I call it a stitching retreat because the Slow Stitching Movement embraces those who knit and embroider, not just those who quilt and piece. It would be wrong to call it a quilting retreat.

Above are the strips that I cut to take with me to the retreat for the daily sewing activity. It turned out that we used the one inch strips to do log cabin blocks. I can’t do justice to the activity by trying to describe it. You kind of had to be there, but it was meditative, and there was a different emphasis on the thought process each day. Our log cabin stitching work occurred in the morning following our morning writing, which is an exercise taken from the book “The Artist’s Way”.

I completed about two and a half blocks while I was at the retreat during the stitching exercise segments and also while I was using the machine trying to decide if I wanted to buy it or not. When my machine was delivered last Wednesday I set it up on my dining room table and continued to work on the log cabin blocks in an effort to familiarize myself with the machine.

Below you can see the state that my dark and light strip collections were in after I finished four blocks. I didn’t cut any new strips while I was creating those blocks.


I have to admit that I am quite intimidated by the machine. I have not yet scheduled my class with Pocono Sew and Vac, and I will do that soon. Until then I am getting to know the most basic features of the machine. I have not tried any fancy stitches, nor have I tried any feet other than the one that was installed on the machine when I got it. I haven’t even threaded the machine or loaded the bobbin since I am still working with the thread installed on the machine as a demo unit.

I love the needle up/down feature.

I love the thread cutter.

I have used the knee lift, but don’t really feel the need to use it. I think maybe I need to adjust the angle to get the best use out of it, and if I were doing free motion quilting I bet it would come in handy. At first I used the foot pedal to control the speed, but decided to give the “Start/Stop” button a try. You have to unplug the foot pedal to use the button to start and stop the machine. It took some getting used to, but I think I like using the button instead of the pedal. I set the speed relatively slow because once you activate stitching with the button it speeds up to the maximum speed you have it set for. In the photo below you can see that I have it set fairly slow. When you first touch the button as long as you keep your finger on it, it goes quite slowly. When you take your finger off the button it speeds up to what you have set. You can slow the machine down when you decide to stop stitching by holding the button and releasing it on the last stitch.

Using the “Stop/Start” button would allow me to place the machine on a counter and sew standing up, which would be a great benefit in terms of fitness.

I watched the DVD that came with the machine, but taking the class is really going to make a big difference for me. I will be able to ask some questions about free motion quilting. I have no idea how to get started with free motion, or even with a walking foot. I definitely want to know whether I should be purchasing add-on feet for quilting or using the provided feet for quilting. The machine comes with a basic darning foot that looks like it could be used for free motion, and with an even feed foot, but Janome makes add-on feet as well. There must be a reason for that.

I made four blocks and decided to add them together with the darker portions in the center. It is my goal to bat and back this unit, and to do some machine quilting on it, perhaps with the provided even feed (walking) foot.

The one design decision that I did make when piecing was to be sure that I included some crimson on all four squares. I also ended two of the squares with the very dark blue fabric. That paid off as a unifying element when it came time to join the blocks, especially since the two other squares used the crimson fabric along the edge.

I sure did sort my strips well by value. Look at the way that dark section pops! I can’t say I am in love with this piece as an aesthetic object. However, I am really enjoying the process, and I am enjoying learning about the machine too. I want to learn how to do new things.

I showed this piece to my husband after I was done putting the four units together. He had seen me working on it. His comment was, “You really did put that together quickly with the machine.” He is used to observing me sitting on the couch with English Paper Piecing for hours with little result. I must say that the speed with which this came together gives me pause. Where is the money going to come from for all the fabric I would consume if I were to get serious about using the machine?

Hmmmmmm. I knew there was a reason I liked paper piecing. One of the reasons I chose to work with hexagons is that I knew they would not break the bank. Speaking of breaking the bank, I made a serious investment in new fabrics at the retreat and at the Pennington Quilt Works on the way home. I bought them specifically to expand my horizons in hexagon work. I may be showing those fabrics off soon.

Is there anyone reading this from the Slow Stitching Movement Retreat who also purchased the Skyline S5?

Share this:

  • Email
  • Facebook
  • Twitter
  • Pocket

The First Slow Stitching Movement Getaway

04 Monday May 2015

Posted by Terri Schurter in Uncategorized

≈ 7 Comments

This is the panoramic view from the ballroom at the First Slow Stitching Movement Getaway. It was held from April 21st to April 24th in beautiful Lambertville, New Jersey at the Lambertville Station Inn. Below is a shot of the Inn taken from the bridge returning on foot from New Hope in the early evening on Thursday.

Below is only part of the ballroom where most activities took place.

Here is my station with the Janome Skyline S5 that was on loan to me for the duration of the event thanks to Pocono Sew and Vac.


The demo units were offered to us at the low price of $899.00, and upon returning home I decided that I wanted to purchase my unit, which happened to be unit #1. They shipped it to me and it arrived the following Wedesday.

This event was fantastic. It was filled with activity, yet we had time to do our own thing. I managed to make some friends and will stay in touch with them via the Slow Stitching Movement Facebook page. If this event is offered again, I will be sure to be there, and I recommend it to you as well. There was no pressure to be modern, and there was respect for hexagons. It was nice to see some people embracing hand work over machine work, although machine work was certainly in evidence as well.

During the Wednesday evening trunk show we were each encouraged to share one piece that represents our slow stitching journey. I shared my Batik Flower Garden Quilt. The photograph below is credited to Mark Lipinski. It shows the back of the quilt, which he wanted everyone to see. This photograph was originally shared by Mark on his Slow Stitching Movement Facebook page. Thank you Mark for appreciating my work.

There was no pressure to participate in any of the activities, which was really nice, so you could be as active as you wanted at the getaway. I spent a great deal of time sitting in the best lit area of the ballroom hand stitching with others.

I felt as if I had found a group of kindred spirits at this getaway, and I hope to see them again in the big stitching community.

Share this:

  • Email
  • Facebook
  • Twitter
  • Pocket

Subscribe to Blog via Email

Enter your email address to subscribe to this blog and receive notifications of new posts by email.

Join 41 other subscribers

Recent Posts

  • Not Sure if I Want To Blog Anymore
  • Annoyed With Bluehost
  • Pandemic Still Life
  • Staying with Bluehost
  • Farmer’s Wife Friday: Week 20

Recent Comments

  • AmandaEcobiab on Not Sure if I Want To Blog Anymore
  • Wynne.price, nz on Not Sure if I Want To Blog Anymore
  • Visionhuq on CJMQG Fall Retreat
  • Deidre Jenkins on Annoyed With Bluehost
  • Wynne on Annoyed With Bluehost

Archives

  • December 2024
  • June 2023
  • June 2020
  • January 2019
  • December 2018
  • November 2018
  • October 2018
  • September 2018
  • August 2018
  • August 2017
  • May 2017
  • April 2017
  • March 2017
  • January 2017
  • November 2016
  • October 2016
  • September 2016
  • August 2016
  • July 2016
  • June 2016
  • May 2016
  • April 2016
  • March 2016
  • February 2016
  • January 2016
  • December 2015
  • November 2015
  • October 2015
  • September 2015
  • August 2015
  • July 2015
  • June 2015
  • May 2015
  • April 2015
  • March 2015
  • February 2015
  • January 2015
  • December 2014
  • November 2014
  • October 2014
  • September 2014
  • August 2014
  • July 2014
  • June 2014
  • May 2014
  • April 2014
  • March 2014
  • February 2014
  • January 2014
  • December 2013
  • September 2013
  • August 2013

Categories

  • UFO
  • Uncategorized

Proudly powered by WordPress Theme: Chateau by Ignacio Ricci.