• About Terri Schurter

Hexy Lady

~ my second act in fiber arts

Hexy Lady

Monthly Archives: May 2014

Table Runner Number Three

25 Sunday May 2014

Posted by in Uncategorized

≈ 1 Comment

I posted last week about Table Runner Number Two and Louise commented that she has finished some hexie borders by cutting off excess portions of hexagons after sewing on the border.  She suggested that this might be easier than using half hexagons. I decided to give this a try on my latest table runner instead of doing the half hexagon border I had planned.

My main concern in doing the border in this manner regards the stability of the hexagon seams on the outer border after the seams are cut in half.  I realize that the machine application of the border to the front of the quilt top would serve to stabilize the seams like it does with machine seams of traditional piece work.  However, machine seams are more stable in themselves because they are composed of two threads which are interlocked.  Perhaps one row of stitching is enough to hold them in place.

My other concern was cutting the excess accurately.  Should I use a rotary cutter, or should I use a pair of scissors? I was afraid to use a rotary cutter because there was just too much potential to get confused and make a slice I would regret.

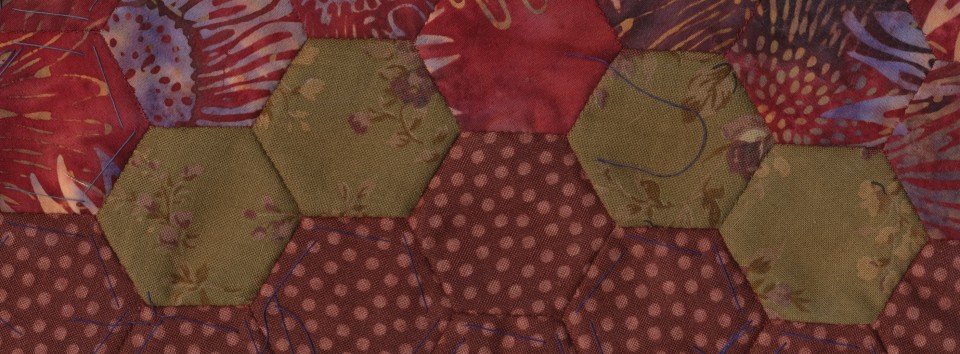
I decided to kill two birds by starting out with a contrasting color of stitching on the pieced top that would show where I would ultimately cut the border in half and stabilize the seams at the same time. I’m glad I decided to do this because it pointed out to me exactly how easy it would have been to make a mistake in my cutting without some additional guidance.  The straight areas were easy to sew, but I sewed both angled areas incorrectly the first time I sewed them.  See below.

I Had to rip out the excess stitching on the two angles that form the center of the piece because that stitching would have shown if I had left it in place.  I was able to fix the eight other angles by adding extra stitching where it belonged.

After sewing with the contrasting thread I decided to sew with my green thread just inside the contrasting line to provide even more stability for the seams after they were cut.

I then got the piece ready to baste.

I use a method of basting that tailors use.  You can see it here.

To provide even more stability for the seams on the border, and to make trimming the excess fabric easier, I stitched along the inside with green one more time after basting the quilt.  This joined all three layers together.

I quilted the piece before trimming away the excess on the borders. I decided to trim using scissors, and to trim outside of the contrasting thread line to preserve this row of stitching as a stabilizing element in the border.

I used a utility quilting method applying straight lines of stitching through the center of alternate rows of hexagons in all three directions.  This results in a triangular quilting pattern.

I still need to bind this piece, but I need to order some more hunter green fabric in order to do so. I’ll be ordering enough for the Diamond Quilt backing while I am at it. After I complete the binding I will be able to see what a half hexagon border will look like on my Diamond Quilt regardless of how I choose to achieve that border.

My gut feeling about the Diamond Quilt is that I should not use this method for the border.  I still worry about the stability of the cut seams even though I provided four new stabilizing rows of stitches to hold those seams in place. That is probably more than enough for a table runner that won’t see the inside of a washing machine very often.  However, a quilt that is going to get a lot of wear, and many washings should have seams that are stabilized with knots so they can’t come undone. The Diamond Quilt is going to be an heirloom quilt.  As such, it deserves to have the extra time invested in doing the border with half hexagons rather than slicing full hexagons in half and leaving a vulnerability in the construction.

If I was going to make a 3/4 inch hexagon quilt, or a 1/2 inch hexagon quilt I might press the hexagons in half and use a border wide enough to cover the excess., but I don’t think I would cut away the excess on a bed quilt.

Does anyone think I am being too conservative?
Share this:

  • Email
  • Facebook
  • Twitter
  • Pocket

Table Runner Number Two

19 Monday May 2014

Posted by in Uncategorized

≈ 6 Comments

Last week I decided to create another table runner with the express purpose of doing a half hexagon border and bias binding.  The piece started out as a series of rows made up of random units I had pieced for previous projects.  I had every intention of making this fast and simple just so I could get to the half hexagon border and the binding.

Unfortunately, or perhaps fortunately, this piece soon took on a life of its own.  I started to focus on the yellow batik fabric.  I had a handful of these units at my disposal, and I thought it might make some sense to use those units to provide a small sense of unity and symmetry for the piece.  I thought I might build the rest of the piece around the strategic location of the yellow units.

After creating a strip with two yellow units placed at positions number two and four (in a five unit strip) I noticed that I had quite unintentionally made the strip entirely symmetrical.  I did this by finishing off positions one and five with the same fabrics.  From there is was a matter of designing some three unit strips to go on either side of the five unit strip.  I used the hunter green as the center point for those narrower strips because I wanted to incorporate some of the border color into the main design. I finished the ends with the same fabrics as used in the five unit strips.  The results can be seen below after the strips were joined with solid maroon, which worked in a wonderful way with the maroon batik that made up the center of the five unit strip. I found that I had quite unintentionally created overlapping grandmother’s flower garden units, which would surely become the centerpiece of the design, especially if I find a way to emphasize them with my quilting.

Once I had gotten to this point it seemed absolutely shameful to consider abandoning the symmetry of the piece, so I looked to see what units I had available to me, and found that I would be able to repeat the five unit strip two more times, and repeat the three unit strip two more times as well.  That would be enough to create a piece with the angles I desired. I now show the joined strips on the same bed of flowers I used as a showcase for my previous table runner. It may be interesting to note that I had to remove the four maroon hexagons closest to the corners of the runner in order to finish off the angle in a pleasing manner. Sometimes working spontaneously requires some ripping.

I joined my strips with the red hexagons to continue to create the flower garden units, but left empty spaces behind because I was not totally committed yet to using the hunter green to finish the connections.

Viewing the piece against a wooden surface shows the areas to be completed more clearly. I did decide to finish those areas off with the hunter green.  I’m quite happy with the way this piece is turning out.  It is a departure for me in terms of brightness and contrast. I attribute that to the strong contrast among the yellow batik fabric and the solid maroon and hunter green. Notice the four missing maroon hexagons in the final piece.

I had initially thought that I would add an additional border of hunter green hexagons and finish off with a half hexagon border.  However, this piece had taken on a life of its own, and I wanted to do what was best for it, and not just use it as a sample for the border I hoped to use on the Diamond Quilt.  I decided that adding a full border of green was going to make the piece too wide, and also add too much green.  Therefore, I needed to decide if the half hexagon border would be sufficient.  I put out paper pieces of the correct size to help me decide.

I came to the conclusion that I wanted the larger partial hexagon border.  I suppose you might call that a three quarters hexagon border rather than a half hexagon border.  It will, in fact, look exactly the same as the border that I made on my previous table runner.  However, it will not have not have pieces of whole hexagons folded over to achieve the effect.  The pieces will be made to size.

In retrospect, I think this new table runner might have been okay with the half hexagon border, but it will look fine with the border I gave it.  I think I made the right decision for the piece.  I do fully intend to try the half hexagon border on a small piece before I make a final decision on the Diamond Quilt.  The 3/4 border would be easier to piece because the pieces are larger, but I think the 1/2 hexagon border is actually the right way to go on the Diamond Quilt.  I just want to see how difficult the smallest pieces will be to work with before I commit to it. I also want to see if the binding looks awkward in the narrowest area of the border.

Here are some more photos of this table runner showing the edge from the front and the back.

This piece will always hold some sentimental value for me because one of the yellow batik units is the first thing I ever pieced out of hexagons. The thread I used was too heavy, and wasn’t even the right color, and those stitches show on the front.  But for me that will be a reminder that this is where I started my hexagon stitching journey.


Share this:

  • Email
  • Facebook
  • Twitter
  • Pocket

Fear of Binding

12 Monday May 2014

Posted by in Uncategorized

≈ 5 Comments

I might rightfully have titled this post “Diamond Quilt Progress: Post Thirteen” because everything I am reporting today is about things I did to bring about the eventual completion of that quilt. However, in doing those things I created a totally new object specifically to gain practice in a technique of binding. That technique is unfamiliar to me, and I actually fear it. The technique is binding angles other than 90 degrees with bias strips. I’ll admit it. I have a severe fear of binding. My fear is so deep that I could not consider using this technique on my queen sized quilt without first having tried it on a smaller piece. In order to do that I made a dining room table runner, which turned into quite a large piece. I have a tendency to make a big deal out of my samples. The table runner will have it’s own post soon to describe the construction process. Here I will address only the binding. After completing the quilting on the runner I decided to dive into the work on the binding.  My initial impulse was to add small pieces to the edge to finish it off with straight edges allowing me to add a traditional type of folded bias binding.  I would turn corners as necessary.  The paper pieces in the photograph below represent the pieces I intended to add.

I actually made and added a few of the smaller pieces before deciding that this was too laborious and tedious for EVEN ME. I don’t mind spending the time, but it was very frustrating work, and it was almost impossible to match up the narrow corners of the smaller diamond pieces with the corners of the existing hexagon pieces on the table runner. Perhaps if the hexagons were much larger it might have been a different story. However, given the one inch hexagons I was using, I had to admit defeat. If adding pieces wasn’t the right way to proceed, then perhaps taking pieces away might work better. By taking them away I mean folding them under the edge.  I folded under the short triangular projections of the hexagons along the edge, pressing them into place, and pinning them down.

I then sewed the projections down so they would not pop out of place as I was adding the binding strips. This entire process was laborious. It also added a good deal of extra fabric to the binding, which made it difficult to pull the binding far enough to hide the sewing line on the reverse side, but I managed to handle it.

After completing the binding I decided that a slightly different method might prove less time consuming. I was also seeking to maintain the integrity of the double hexagon border on the Diamond Quilt.  The method I had used on the table runner lost a bit of a row of hexagons that I considered to be important to the border.  What I have decided to do for the Diamond Quilt is to add an additional row of half hexagons around the edge. This will create a straight border which will add only the extra fabric of the edge of the half hexagon to the binding. Being as obsessive as I am about the binding on the Diamond Quilt, I am going to create another table runner that will be finished off with a border of half hexagons.  I’m planning to complete that project before I start adding the half hexagons to the Diamond Quilt.

My fear of binding goes back to the beginning of my work with hexagons about a year ago.  I became aware that all of the quilts I had created during my First Act In Fibers had been bound incorrectly.  I had simply hemmed them.  That is how I learned how to finish my quilts. It was what was recommended in “The Perfect Patchwork Primer”, the only book I had at the time. I always made sure I had enough of the quilt top to turn to the back and hem. I hemmed my quilts with a blind stitch, and they turned out fairly well, but I had never learned how to do a proper binding.

Looking at my grandmother’s quilts I saw that she had never mitered her corners on her bindings, nor had she ever used bias strips.  She did, however, use straight grain binding strips, and she overlapped them at the corners and sewed them neatly into place. It was possible for me to avoid the issue of using binding strips altogether for a short period of time by creating a method of binding using hexagons, as illustrated below. I knew, however, that this was not a sturdy binding method to be used on pieces requiring heavy use, such as bed covers.

Last summer I was making some panels to hang downstairs to keep air conditioning limited to the living room and the dining room. I knew that I was going to have to bind those items with a straight edge, and it simply made sense to learn how to do a proper bias binding while I was at it. I signed up for a workshop in binding at the Pennington Quilt Works and took copious notes.  I seemed to have missed some of the finer points, however, because my corners proved to be less than satisfactory, and I was more afraid of binding than ever.  If I could not create a passable corner with two teachers hovering over me, what hope was there? I went on to do some research on the web, watched some tutorials, and I got better at doing a 90 degree angle.

When it came time to apply the binding to the front of this table runner, however, I went back to the web and found some good tutorials on Jaybird Quilts. These tutorials involved angles other than 90 degrees and gave me the confidence to do the unusual angles in my table runner.  In spite of that, I will admit to being quite anxious about the applying the binding until I was able to get the piece off the machine and see that it was going to turn attractively to the opposite side.  I was especially worried about the ends of the piece, which had severe angles. Below I’ve provided some photographs of the table runner. I took it outdoors to get the best light.  There is a colorful growth of tiny flowers along the driveway, which I took advantage of as a backdrop in the last few photographs.

14169756835_932a8f1fdd_c

14167038312_c944ef84c0_c


Share this:

  • Email
  • Facebook
  • Twitter
  • Pocket

Diamond Quilt Progress: Post Twelve

04 Sunday May 2014

Posted by in Uncategorized

≈ Leave a comment

Since my last progress report I have completed the four corners of the quilt top.

I started each corner by creating the framework of hexagons behind which the solid hunter green fabric would be appliquéd.

I cut the pieces of solid fabric as rectangles. I made them large enough so they could be pinned with the grain of the fabric matching the vertical direction of the quilt top.

When I was pinning the last piece of solid fabric I got the brilliant idea of taping the fabric to the table to smooth it into place when I did the pinning.  It was possible to smooth the fabric without taping it as I did with the first three corners, but taping the fabric helped considerably with the final corner. I wish I had thought of it earlier.

Below we see the solid fabric from the back of the quilt top after it has been pinned into place, but not yet sewn.

Below we see the fabric pinned into place, and shown from the front.

Below we see the solid fabric from the back of the quilt top after it has been sewn into place, and not yet trimmed.  It may be hard to see the stitching.  The row of hexagons with paper still in place at the top are the very top of the quilt.  You can see how these hexagons run parallel to the grain of the fabric.


Below we see the fabric after it has been trimmed.


Below we finally we see the nearly finished quilt top on a king sized bed from two viewpoints.  As you may recall, this quilt has been designed for a queen sized bed, but I am showing it here so more of the surface area is viewable.

Whether the quilt top is finished or not will depend on my choice of binding method.  I am currently working on a large sample piece to test one of the binding methods I am considering.  That sample piece is going to be a table runner for the dining room when it is finished, and it will also be a means through which I will experiment with quilting designs for this bed quilt.


Share this:

  • Email
  • Facebook
  • Twitter
  • Pocket

Subscribe to Blog via Email

Enter your email address to subscribe to this blog and receive notifications of new posts by email.

Join 41 other subscribers

Recent Posts

  • Not Sure if I Want To Blog Anymore
  • Annoyed With Bluehost
  • Pandemic Still Life
  • Staying with Bluehost
  • Farmer’s Wife Friday: Week 20

Recent Comments

  • AmandaEcobiab on Not Sure if I Want To Blog Anymore
  • Wynne.price, nz on Not Sure if I Want To Blog Anymore
  • Visionhuq on CJMQG Fall Retreat
  • Deidre Jenkins on Annoyed With Bluehost
  • Wynne on Annoyed With Bluehost

Archives

  • December 2024
  • June 2023
  • June 2020
  • January 2019
  • December 2018
  • November 2018
  • October 2018
  • September 2018
  • August 2018
  • August 2017
  • May 2017
  • April 2017
  • March 2017
  • January 2017
  • November 2016
  • October 2016
  • September 2016
  • August 2016
  • July 2016
  • June 2016
  • May 2016
  • April 2016
  • March 2016
  • February 2016
  • January 2016
  • December 2015
  • November 2015
  • October 2015
  • September 2015
  • August 2015
  • July 2015
  • June 2015
  • May 2015
  • April 2015
  • March 2015
  • February 2015
  • January 2015
  • December 2014
  • November 2014
  • October 2014
  • September 2014
  • August 2014
  • July 2014
  • June 2014
  • May 2014
  • April 2014
  • March 2014
  • February 2014
  • January 2014
  • December 2013
  • September 2013
  • August 2013

Categories

  • UFO
  • Uncategorized

Proudly powered by WordPress Theme: Chateau by Ignacio Ricci.