It should be no surprise that I follow a blog called The Hexie Blog. Today the author of that blog, Julia Wood, posted a question from one of her readers about adding border strips to a hexagon quilt. I’ll let you read that query for yourself on The Hexie Blog.
Since I have had experience fleshing out the edges of hexagon pieces in just this manner, I decided to write to Julia and summarize my process incase she wanted to pass on the information to her reader. I referred her to a post in which I showed two such projects, and promised that I would take close up photographs of the corners and the edges of the one with the wider borders, and get back to her with those images today. I decided that the best way share them with her was to share them with you right here.
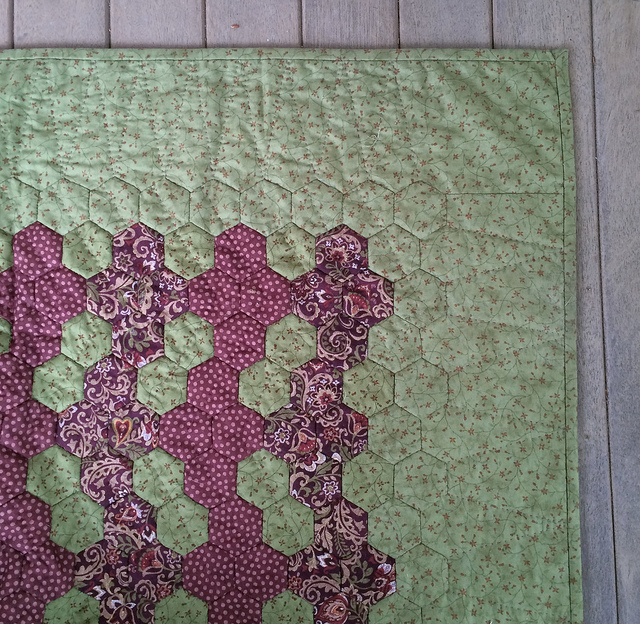
First let’s take a look at the images:
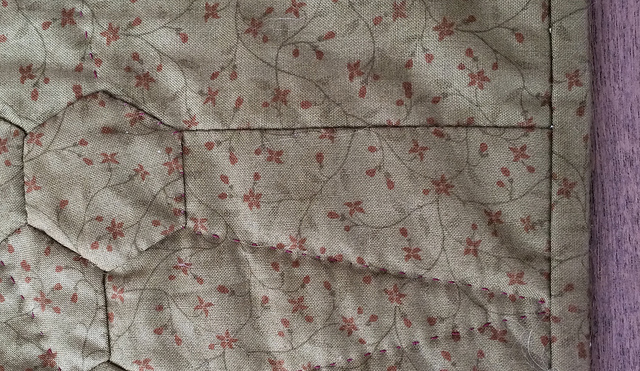
Here is the upper right corner of the panel. Notice the “seam” joining the side strip to the top strip. It isn’t a seam. It is appliquéd in place. This is the secret.
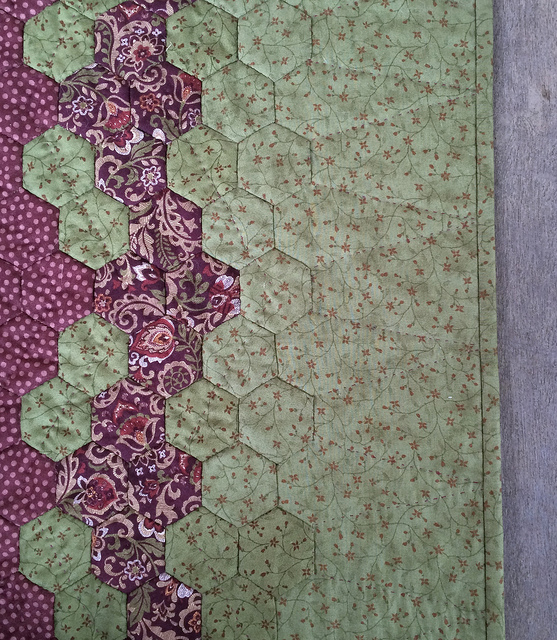
Here is the right side of the panel. The edges of the hexagons were lined up with a ruler to insure that this was straight. By the way, notice that I fleshed out the border of the hexagon work to match my border strips. It isn’t necessary, but I think it adds to the effect.
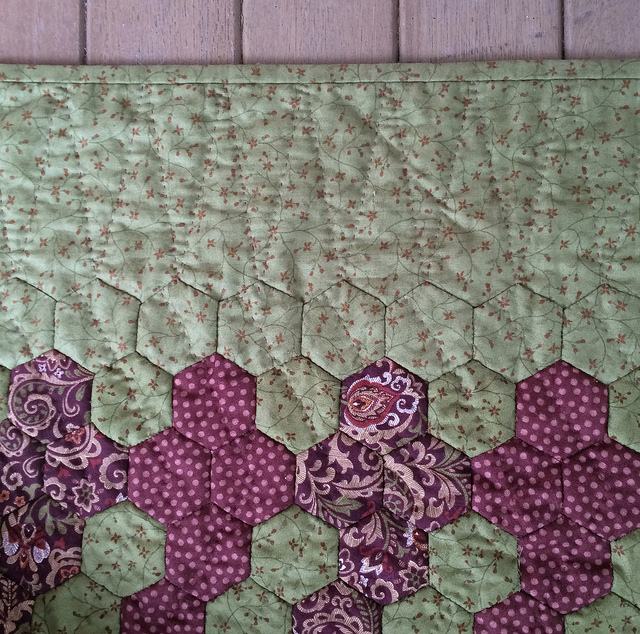
Here is the top side of the panel. This edge was also lined up with a ruler.
Here is a closeup of that “seam”. Even close up it is hard to tell it is done with appliqué.
You’ve seen the pictures. Now, for additional clarity, you can read about the process:
I cut strips for all four sides allowing for some extra length to be cut off later. I also allowed for an extra half inch to go under the edge of the hexagon work (measuring from the part that would be farthest from the outer edge). I guess you could call that the equivalent of a seam allowance.
I added my strips to the left and right sides first leaving at least a half inch of extra fabric along the end of the strip to fold under later. (More about that below.) I placed the strip on the table and laid the hexagon work over top of the strip. I pinned every hexagon and measured with a ruler every time to be sure I was placing the hexagon the right distance from the edge of the strip.
Edit: Actually, there is an alternative way to do this, and it may have been the way I actually did it. It was over a year ago that I did this border, after all. The alternative method is the lay the hexagon work face down on the table. You then take your strip and line the edge up perfectly with a reference on the reverse side, like the top edge of a row of hexagons. If you do it this way you will have to pull out the pins and pin them again one by one after flipping the work. You will also have to cut a wider “seam allowance” for the strip depending on what reference you are using. Either method will work, and I think they are probably equally time consuming.
After sewing the left and right sides to the strips I turned back the excess on the ends of the strips and pressed to get a sharp edge. These edges would be hand sewn to the top and bottom strips along with the hexagon edge. This avoids the need to figure out how to piece a “frame”. (By the way, as a side note, I would not recommend piecing a frame and trying to lay out the hexagon work on top of it. That approach is fraught with possibilities for distortion.)
The top and bottom strips were pinned into place in the same manner as the strips on the left and the right. Then they were hand sewn.
There is one thing about which one should be particularly careful. You want to be sure that neither the strips, nor the hexagon work, be stretched in the process of joining. It would be easy to get the unsightly ruffling effect you sometimes see on quilts along the edge if one or the other surface were stretched in the process of joining.
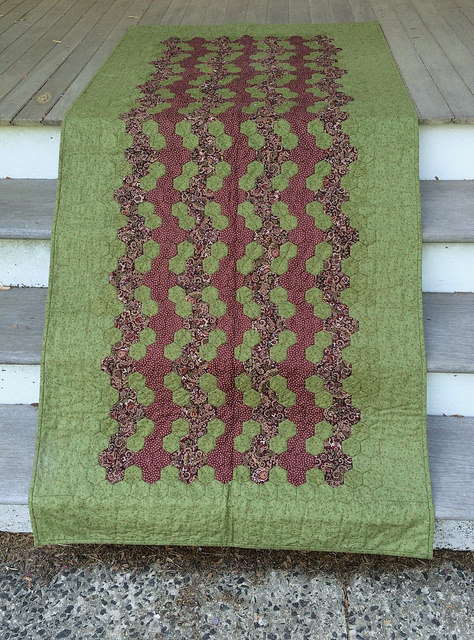
Incase you did not take a look at the post linked above, here is a shot of the project from which I took the detailed photographs above. It is a panel I have used to hang between my dining room and kitchen to keep the air conditioning in the dining room.
Edit: After publishing this post I went over to The Hexie Blog to read the comments on the original blog entry where the call for help was made. Interestingly enough, one of the comments was from a woman who said that she is doing the quilt in “The New Hexagon” by Katja Marek. She said that Katja has them appliqué the sides to their borders, fold down the top and bottom edges of the side borders, and then appliqué to the top and bottom borders. I guess great minds think alike. We both came up with exactly the same method independently of each other. That isn’t actually so amazing though, because it isn’t that complicated a method, but it is still interesting to me that it happened that way.
Thank you. I have the first border pinned on both sides and will start to appliqué them tomorrow. I like your idea to appliqué the borders instead of mitering. Will send another picture when it is finished.
Thank you again!
Wow! That was really fast.
It is probably too late to consider this, but when you said “mitered corners” you made me think of something.
You could create the appearance of mitered corners by leaving enough length on the vertical strips so you could fold them under at a 45 degree angle and appliqué them so they look like mitered corners. It is something to think about for the future.
I am glad that this was helpful to you. When Julia put the call out for help I couldn’t resist jumping in.
One other thing. I am curious. Did you pin the border the first way I described, or did you do it the second way I described? Right side up, or right side down? I’ve got to know. 🙂
I LOVE this! I’m still a long ways from needing to finish the edges of my Martha Washington’s Flower Garden, but I’ve been fretting about how I’m going to do that. I like the idea of appliquing in such a way to give the appearance of a mitered corner (since my first attempt at a mitered corner was an epic fail! ha!).
Thank you so much for answering that question. It is one I had some time ago and that hexie/diamond top remains unfinished. What a great way to complete it. Now I just have to find where I sit it aside and get it done.
:)Carol
I am glad that you have found this useful.
Thank you for the tutorials. These instructions are very clear. I’ve bookmarked this page for future reference as I am not yet done with my hexi quilt but like everyone, was wondering how to finish it … beautifully. ;^) Thanks again.
I’m glad that you liked this enough to bookmark it. I think that finishing a hexagon project is a bit intimidating. We like the process and get involved in it and then think, “How is this going to end?” I know that’s how I felt.
YOU ARE A CREATIVE GENIUS! I have a hexagon quilt top that i must finish. It was handed down when a relative passed. I just have to preserve her handiwork and her memory. I have been searching for so long to find this solution. Finally, I can go forward. I thank you so much for you detailed description, pictures, and for sharing your expertise!